JS LOAD RENDER PASSES
v. 1.0.2

Js Load Render Passes (short JS-LRP) is a Gizmo for Foundry’s Nuke I developed. It is basically a Sequence Loader using Python to load separately rendered AOVs at ease. There are no extra external Scripts needed, as it solely relies on the the files you rendered and the code integrated within the gizmo. Only select the Beauty Rendering and it will set up the rest for you.
A little bit of Background Information and where the inspiration comes from
Everybody seems to love Multilayer EXRs, especially when it comes to ACEs/OCIO Color workflows for CGI Compositing. Well …
I DON’T!
Here is why I prefer rendering separate files instead, and why you should probably too:
- Performance. Any Compositing tool works much more fluently and efficiently if it does not have to extract all information for all AOVs/passes out of one huge bulky file.
- File Sizes. With different AOVs/passes come different needs. Not all AOVs need to be full 32 bit color depth. When rendering layers to separate files, you can choose the right setting and right file type accordingly. This will save you much disc space on the long run and also use your RAM more efficiently.
- Flexibility. If some frames of one of the AOVs/passes are corrupted, or if one single AOV has had a wrong setting for whatever reason, you can easily re-render just that one AOV, instead off having to re-render everything.
The only Downside is: Organizing all these files manually. And this is where JS-Load Render Passes comes in. You can simply have the best of both worlds. And actually even a bit more.
- You render all AOVs/passes of given compositing layer as separate sequences in the same directory.
- You choose the right settings and desired file type for each AOV/pass.
- You just need to follow a simple naming convention and you are all set. All you need to do is to browse the beauty rendering and off you go.
- See how it works in detail below.
At Studio Rakete, where I work from time to time, we use a similar approach. But I also worked on a different project lately where I had to learn the hard way that Multilayer EXRs containing ALL passes can be a pain, because of the bad performance. I ended up redoing most parts of the rendering, just to get a responsive setup.
And that’s why I’d like to share this.
The property panel and all settings (so far…)

The JS-LRP Properties work from top to bottom.
First you decide if you need or want any of the optional settings like inverting the AO or if you render with blender, if you like to standardize some of it’s unusual RGB values or axis.
Then you hit ‘Load Beauty’. A file browser will pop up and you are asked to browse the beauty rendering.
Please make sure there are ONLY the files in this directory belonging to this given render sequence.
JS-LRP will examine this folder and load all the sequences in new readers, create channels and layers for you and pipe them all together in one stream.
You can see how the Properties and name update.
After Loading the ‘Unload Passes’ button becomes select-able. This is where you can unload the sequences. This will also Reset the Gizmo and revert to it’s initial state.
Also the option to expose AOVs for further compositing becomes select-able.
‘Further Information’ will bring you to this page.
The File Directory only select the beauty sequence

The content of such a folder could look something like this. Please have an eye on the naming convention here. Even though there are different passes with different file types included, the frame ranges and naming structure stays consistent.
Also make sure there are no random files in the folder. Keep your render folders clean.
—
Blender specific Info for rendering out passes separately (click to expand).
You can see below how I set this up in Blender.
This is the compositing view of Blender. On the left you can see the passes I used and that get exposed by the renderer.
I pipe them into different file output nodes with different settings and file types. You may do this differently, but as I was using subtractive compositing, this was a efficient approach.
Take note of the vector passes the renderer exposes. All the purple outs of the renderer in Blender are vectors. You could pipe them in the output directly, but the converted RGB values will be … odd.
That’s why I inserted these set Alpha (to 1) nodes. They actually don’t do much. It’s actually not about the alpha at all. But this way Blender writes out reasonable RGB values. Don’t ask me why, but it works. If you have a better solution, I’m happy if you let me know.
I thought this could be interesting if someone wonders how to deal with Blenders output. So i added this here.

—
Naming Conventions and sub strings see how to name your Files correctly
Naming your Files correctly is essential to make JS-LRP work. Here are some rules you have to follow:
- Directory: All AOVs/passes belonging to this compositing layer need to be in the same Folder. But there mustn’t be other files in there. Keep these folders tidy.
- Naming: All AOVs/passes should follow the same naming convention. Let’s say you want to include the project name, sequence number and shot number in your filenames, a possible name could be:
“Projectname_sq010_sh0010_PassName_####.exr”
All other AOVs need to follow the same structure.
- Frame Range. All AOVs/passes should have the same frame range and the same quantity of digits.
- The end of the name: This is most essential. It needs to end with the following pattern:
“…_PassName_####.fileextension”
The underscores “_” are essential, as well as the fact that there is NO underscore between the frame count and the file extension.
- Substrings. If you want JS-LRP to handle the passes listed below with some common sense, please use the listed substrings in your pass names.
The check for substrings is not case sensitive, so for example “…_ao_####.exr” will work.
And “…_Occlusion-AO-Pass_####.exr” will do the same! eg.
- Pass names. You can name them to your liking, just don’t use underscores “_” within your pass names!
| Pass/Channel | Used Sub String |
| Ambient Occlusion | “…ao…” |
| Alpha | “…alpha…” |
| Beauty | “…beauty…” |
| Crypto | “…crypto…” |
| Light AOVs | “…light…” |
| Pass/Channel | Used Sub String |
| Motion Vectors | “…vector…” |
| Normals (Camera or World) | “…normal…” |
| Position | “…pos…” |
| Shadow Passes | “…shadow…” |
| Texture UVs | “…uv…” |
what happens under the hood / inside the group
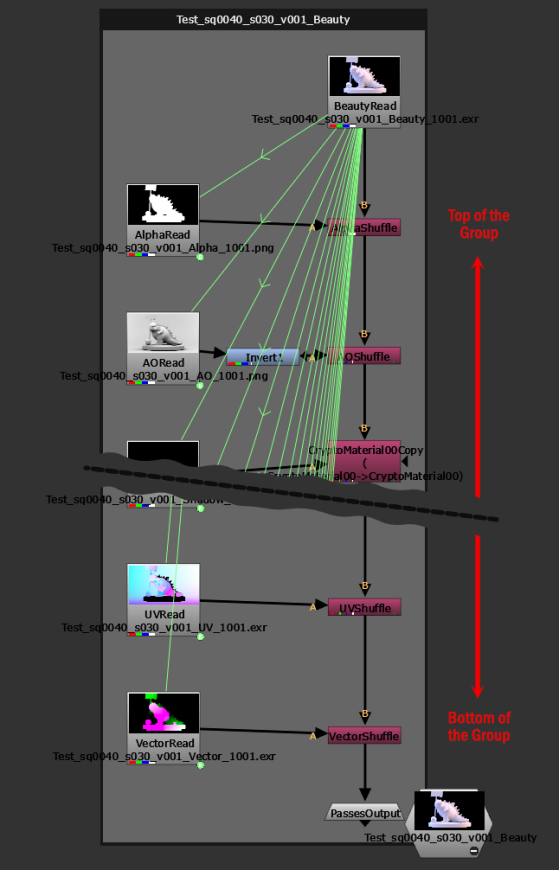
Here you can see what has been created under the hood inside the group. In the picture you just see the top- and the bottom part of the group, because it would otherwise cover way too much screen space. But I hope you get the idea.
At the top is the main reader, the Beauty Reader and to the left are the responsible secondary readers that hold the AOVs/passes.
Depending on the naming convention it looks for the substrings mentioned above and then handles the layers and channels by best practices.
But if you need to adjust anything, feel free to open the group and fix stuff.
But just DON’T rename ‘BeautyRead’ or ‘PassesOutput’. Otherwise the Gizmo can’t operate anymore.
See below how all converted AOVs for this particular render layer look like:

Adding aov comps for subtractive Compositing
Here you can see, what happens when you click the Add AOV Comp button.
The Idea here is to work with subtractive compositing.
This means even though you start with your beauty rendering, you still have the possibility to expose and tweak individual AOVs separately.
You need to have a node in this stream selected first, so JS-LRP knows where to build the little comp.
Another Popup will appear and you can chose from AOVs.
Depending on your naming convention, not all AOVs will be included in this list.That is on purpose to not clutter up the list unnece-ssarily. In a subtractive compositing workflow it makes only sense to expose AOVs, that actually contribute to the Beauty Image.
Other Masking- or Helper-AOVs like AO, Vector, Depth, Position, Crtypto or Normal do not really make much sense in this place.

These little AOV comps can of course be chained together, extended whatsoever. It is just meant to be a starting point for further exploration.
And if you need to work on one of the masking- helper passes, of course you can access all AOVs, layers and channels like you’re used to if you use a shuffle manually.
Download JS load render passes
| Download Version: | Date: | Change Log: |
| JS Load Render Passes v1.0.0 | 2025-03-27 | – Initial Release, so even though there has been some testing, some unexpected Bugs are quite likely. |
| JS Load Render Passes v1.0.1 | 2025-03-28 | – Added a sanity check for the file browsing script. – Little bug fix on the ‘Adding AOV Comp’ button script. |
| JS Load Render Passes v1.0.2 | 2025-04-01 | – Added some callbacks to protect names of two essential nodes |
But if you prefer, you can also download the Gizmo over at Nukepedia. I’ll do my best to keep it up to date on both sources.
Thanks to Anthony Tan who’s Youtube videos are just the BEST starting point you could have, if you want to get going with
Python inside of Nuke.
Nico Rehberg, for his inspiring wisdom as skilled pipeline TD.
And also Tim Liebe, Erwan Leroy, Wouter Gilsing, Ben McEwan and Tony Lyons
for other Nuke wisdom and help i could absorb.